Developing a microservice with AWS Serverless

Leveraging Golang, the Serverless Framework, AWS Lambda, Amazon API Gateway and Amazon DynamoDB

Introduction

As mentioned in the previous blog article “Microservices with AWS Serverless”, AWS Serverless removes the need to maintain infrastructure, while reducing overhead and allowing more time for development, which eventually leads to a faster time-to-market. When a microservice’s scope fits the scope of an AWS Lambda function, it can be effectively built, deployed and monitored in addition with services like Amazon API Gateway, Amazon DynamoDB, and AWS CloudWatch.


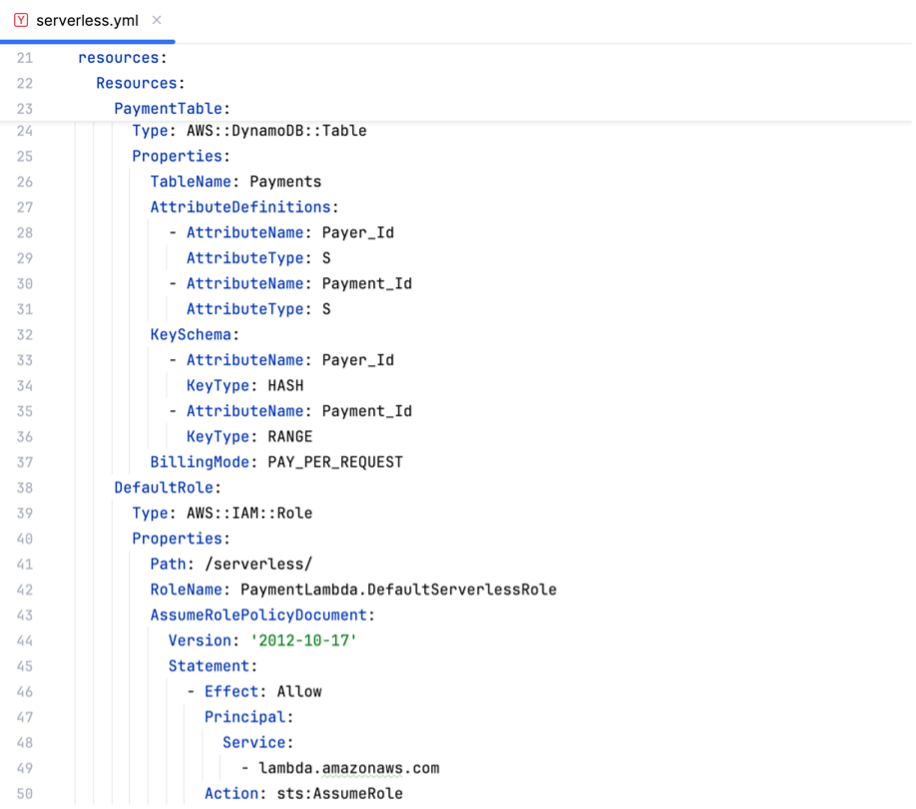
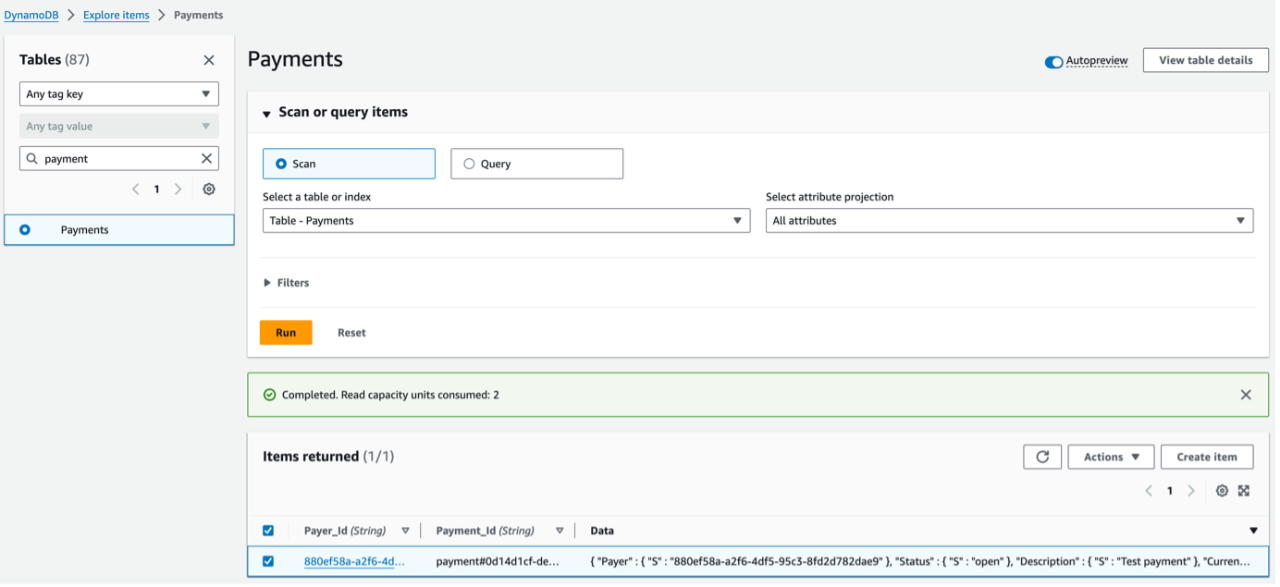
Thus, this blog post focuses on showing a concrete implementation example of a simple microservice application, written in Golang and leveraging AWS Lambda amongst some other AWS Serverless services.

Setting up a microservice with Golang, Gin and the Serverless Framework

In the following, a small payment service is implemented as an example using Golang, Gin, the Serverless Framework and some of AWS Serverless’ services to build and deploy the microservice. The basic architecture consists of AWS Lambda to run the service, Amazon API Gateway to route and authorize requests to the service, and Amazon DynamoDB to persist the payment data is shown in figure 1.

User Interaction with the Payment Service that is comprised of Amazon API Gateway, AWS Lambda and Amazon DynamoDB

Figure 1: User Interaction with the Payment Service that is comprised of Amazon API Gateway, AWS Lambda and Amazon DynamoDB

The service will provide create, read and update functionalities for users to manage payments like getting a payment history, creating and updating payments via a REST API interface.


Golang [1] has been chosen as the programming language for this example project as it is easily readable and concise. It also fits nicely to the Lambda functions as they can handle multi-threading where Golang usually shines with its lightweight goroutines that are easy to spin up and manage. Of course, one could have used any other language like Java or Python for this purpose and is not limited to one programming language, as already mentioned in the previous blog “Microservices with AWS Serverless”.

Setting up a payment microservice with Golang and Gin

Without further ado, let’s dive into the payment service’s concrete functionality. Next to a GET /version and GET /health endpoint to check the service’s current version and responsiveness, it will provide GET endpoints to retrieve all payments for a user as well as a specific payment for a user. Additionally, users will be able to create and update payments through POST and PUT endpoints. Figure 2 gives a quick overview of the service’s REST API interface.

OpenAPI definition of all the REST API endpoints provided by the payment microservice

Figure 2: OpenAPI definition of all the REST API endpoints provided by the payment microservice
Source of picture

For this article, the payment object is kept simple and easy to understand (see figure 3). The important part for now is that there is some object structure in place that can be used to persist and display payment data for a user. The id of the payment object will be the unique identifier and used to store and retrieve data from the database.

Golang struct that defines the properties of a payment and how these will be named in a JSON object

Figure 3: Golang struct that defines the properties of a payment and how these will be named in a JSON object
Source of picture

Every Golang project starts with a main.go file in a main package (see figure 4). In the main.go file we need to write a handler function that takes care of incoming events when the Lambda function gets triggered. As a web framework Gin is used which is known to be performant and to abstract the request handling logic, while reducing boilerplate code so that developers only deal with important implementation details. At the beginning of the main function, a router is setup (figure 4, line 21), which is then used to map the endpoint URLs (figure 4, line 22) and finally a Lambda function is initialized (figure4, line 23) and started (figure 4, line 25) (there’s a dedicated package that adds support for Gin and Lambda functions which is used in this project (figure 4, line 16, 23) [2]).


Main.go file that serves as the entry point, defining the service’s HTTP routes with Gin and a lambda handler using the AWS SDK

Figure 4: Main.go file that serves as the entry point, defining the service’s HTTP routes with Gin and a lambda handler using the AWS SDK

The service simply routes requests to a payment controller (see figure 5), that does some validation on the user input and then pass the data to a repository (see figure 6). The repository prepares the data so that it can be used smoothly by Amazon DynamoDB (see figure 6). It then uses a database client to retrieve and store the data (the latter part uses the AWS SDK heavily which leads to some boilerplate code and thus is left out to keep the article concise).

Setting up the HTTP routes of the service, mapping them to the respective controller methods

Figure 5: Setting up the HTTP routes of the service, mapping them to the respective controller methods

The PostPayment method takes in user data, validates the input (line 21,22) and sends the valid data to a repository (line 26), while handling possible errors received from the repository (line 28). In case of successful creation of the payment, 201 and the created object are returned

Figure 6: The PostPayment method takes in user data, validates the input (line 21,22) and sends the valid data to a repository (line 26), while handling possible errors received from the repository (line 28). In case of successful creation of the payment, 201 and the created object are returned

The CreatePayment method takes in a payment object, transforms the data to make it suitable for DynamoDB (assigning a uuid to the payment object, the Payer (uuid) as PartitionKey and a string including the payment id as SortKey) and finally persists the data using the AWS SDK’s PutEntity function

Figure 7: The CreatePayment method takes in a payment object, transforms the data to make it suitable for DynamoDB (assigning a uuid to the payment object, the Payer (uuid) as PartitionKey and a string including the payment id as SortKey) and finally persists the data using the AWS SDK’s PutEntity function

Of course, this example service is rather simple and would not be used like this in a production scenario but for demonstration purposes it will do just fine. With this code base, a user can easily create, retrieve and update payments using the service’s REST API interface.

Before we can create the infrastructure in AWS, the code needs to be built and compressed as a zip file and located in the directory that will later be referenced in a serverless.yml file to setup the necessary infrastructure.

We can build our code with the Go build command (specifying linux as the used operating system and the correct path to our main.go file):


              GOOS=linux go build -o bootstrap { main.go file location }


Once this is done, we can dive into the infrastructure part.

Setting up a microservice with Golang, Gin and the Serverless Framework

The Serverless Framework [3] allows us to easily setup AWS Lambda functions, Amazon API Gateway, Amazon DynamoDB and add some policies to the resources using a yaml file. One could really setup any AWS infrastructure they like with the framework, but it was specifically designed for AWS Serverless services and thus makes setting up the necessary AWS infrastructure quite efficient and painless. It can be installed with the following command using npm:


            npm i serverless -g


Now we can create a serverless.yml file at root folder level of the project and define some basics like serverless version (figure 8, line 1), the service’s name (figure 8, line 2) as well as the provider (figure 8, line 5), runtime image (figure 8, line 6), AWS region (figure 8, line 7), a deployment stage name (figure 8, line 8) and even a default IAM role that we want our Lambda function to use (figure 8, line 9-10).

Basic Serverless Framework setup in a yaml file, defining service name, service provider, runtime as well as AWS region and a deployment stage name

Figure 8: Basic Serverless Framework setup in a yaml file, defining service name, service provider, runtime as well as AWS region and a deployment stage name

Next, it is time to define a Lambda function. For this, we need to define a name for it and some other attributes which are:

  • Package.artifact: path to the compressed code that should be uploaded to the function (figure 9, line 2-3)
  • Handler: entry point of the Lambda function (needs to be called “bootstrap” as of Serverless framework version 3, see figure 9, line 4)
  • Necessary environment variables (here: DynamoDB table name, figure 9, line 5-6)
  • Events (figure 9, line 7-22)


The last key “events” specifies how the Lambda function will be triggered. In our case it will be triggered by http requests through the API Gateway, hence the “http” key but it could also be triggered by a queue or notification through Amazon SQS or Amazon SNS or many other services.

Definition of an AWS Lambda function in a serverless.yml file

Figure 9: Definition of an AWS Lambda function in a serverless.yml file

Additionally, the resources for DynamoDB and the Default IAM role need to be defined. For DynamoDB, the Partition and Sort Key have to be specified as they cannot be modified after table creation. For the IAM role, two things are important to define:

  • It needs permission to assume the Lambda function (figure 10, line 43-50)
  • The Lambda function needs access to DynamoDB operations (figure 11)
DynamoDB and IAM role setup with the Serverless Framework

Figure 10: DynamoDB and IAM role setup with the Serverless Framework

IAM Policy allowing DynamoDB actions on the table “Payments”

Figure 11: IAM Policy allowing DynamoDB actions on the table “Payments”

Deploying the Golang microservice using AWS Lambda, Amazon API Gateway & DynamoDB

Once the setup is complete, we can use the command “serverless deploy” in a terminal to initiate the creation of a so-called AWS CloudFormation stack. What will happen in the background is that a CloudFormation template is created and stored in a distinct AWS S3 location. This template will be used by AWS CloudFormation as a blueprint to setup all the resources within the stack. Once the stack creation was successful, you should be able to see all the resources under the “Resources” tab in the AWS Management Console (under “CloudFormation”, navigate to “Stacks” and select the new stack -> the stack’s name will be {service-name}-{stage-name} as defined in the serverless.yml file). The stack’s status should be “CREATE_COMPLETE” (or “UPDATE_COMPLETE” if it’s been updated successfully). This should indicate that all resources defined in the stack were successfully created, which can also be verified under the “Resources” tab. All resources like e.g. the API Gateway (which is automatically created by Serverless without the need to specify it in the serverless.yml file) should have the status “CREATION_COMPLETE” (see figure 12).

payment-dev stack in AWS CloudFormation after successful resource creation

Figure 12: payment-dev stack in AWS CloudFormation after successful resource creation

From there we can navigate to our API Gateway and check its “Stage” tab to get it’s invoke URL. This URL is the base URL for sending requests to the payment service (note that after deleting and re-creating the stack, the invoke URL will change). Furthermore, one could have more than one stage here, for example for “dev”, “test”, and “prod” to manage different environments of a service. Amazon API Gateway also shows all REST API endpoints in a hierarchical order under the “Resources” tab which gives a fast and comprehensive overview of what the service provides (see figure 13). It also shows the authorization method used, in this case “AWS_IAM” which requires valid AWS credentials and the permission “execute-api”, otherwise requests made to the service will result in ”403 Forbidden”.

AWS Management Console for API Gateway showing the “Resource” tab for the payment service with all its available REST endpoints as well as its authorization method

Figure 13: AWS Management Console for API Gateway showing the “Resource” tab for the payment service with all its available REST endpoints as well as its authorization method

Sending requests to the Payment Service

With the code and infrastructure in place, users are now able to send requests against the microservice. Using an API platform like Postman, we can easily send requests to the service, providing a valid authorization header (choose “AuthType” as “AWS Signature” in Postman, providing valid AWS credentials as well as “execute-api” as “Service name”), and get a response depending on the specified input and method type. For example, a POST /payments request with a valid JSON body should result in “201 Created” and output the created object including its id in the response body (see figure 14). The id can then be used as a path parameter to retrieve or update the newly created object.

A successful POST /payments REST call made with Postman

Figure 14: A successful POST /payments REST call made with Postman

Going to the service’s Lambda function in the AWS Management Console, we can observe that it has been triggered under the “Monitor” section (see figure 15). From here, we could also go directly to the service’s logs created in Amazon CloudWatch which is quite useful for troubleshooting in case of errors.

Payment Lambda function showing a trigger at 3pm (bottom left graph), the calls duration (bottom mid graph), error count and success rate (bottom right graph)

Figure 15: Payment Lambda function showing a trigger at 3pm (bottom left graph), the calls duration (bottom mid graph), error count and success rate (bottom right graph)

We can also navigate to the DynamoDB table “Payments” in the AWS Management Console to view the created payment entity with its attributes (see figure 16).

DynamoDB table “Payments” with a payment object entry, showing PartitionKey (“Payer_Id”), SortKey (“Payment_Id”) and the object’s attributes stored in an additional column (“Data”)

Figure 16: DynamoDB table “Payments” with a payment object entry, showing PartitionKey (“Payer_Id”), SortKey (“Payment_Id”) and the object’s attributes stored in an additional column (“Data”)

Finally, we can remove the stack again if needed using the command “serverless remove” which will take care of destroying all the specified resources in the serverless.yml file.

Conclusion

As shown in this article, AWS Serverless services like AWS Lambda can be easily leveraged to build applications without managing the underlying infrastructure. When developing microservices with AWS Serverless, it is crucial to decide on a per service basis whether serverless is the right approach. There is – as usual – no one size fits all solution to developing a microservice. Finding the right scope for a microservice can be a challenging task as well as synchronizing and testing multiple microservices interacting with each other while each microservice manages its own database. Luckily, these are all tasks where AWS Serverless comes in handy and supports developers as much as needed in developing performant, resilient and fault-tolerant applications.